


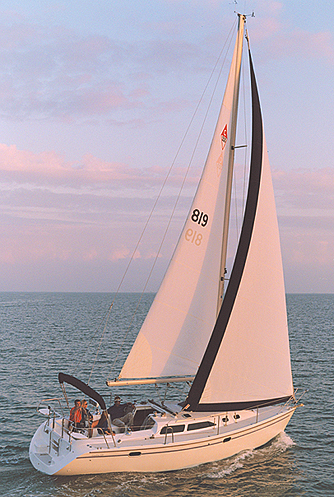
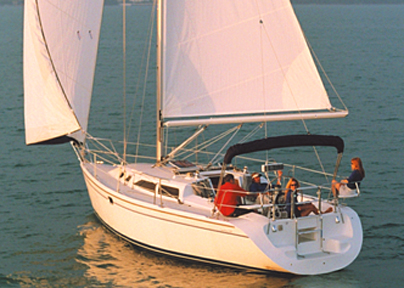
Bareboat Charters
Bareboat is where an ASA or US Sailing certified & very competent sailor takes out our Charter Boat as the Captain with another ASA or US Sailing Basic Coastal Cruising (preferrably Bareboat certified) first mate crew member. By going through extensive sailing instruction & training, most people can become a bareboat skipper. Certain charter companies may require a performance and practical check-out before chartering, even if you have ASA or US Sailing certification.
If you are certified and want to book a boat, please visit the Resources page for information on our tides, swell, weather, and a live web cam of the Harbor Entrance
We accept ASA or US Sailing Bareboat certification on
an individual case by case basis. With a strong sailing resume and
current Bareboat Charter references, we will consider accepting Basic
Coastal Cruising Certified sailors that have sailed in similar conditions (example:
San Francisco Bay).
Pacific Yachting & Sailing
discusses the sailor's experience and if it meets our ocean-going standards -
preferably with a resume and oral confirmation from another one of our approved
ASA or US Sailing charter companies, the practical
bareboat certification requirement may be waived. Thus, it's very important
that bareboat charterers have experienced similiar conditions.
Please see our Practical Check out form below.
The conditions on the Pacific Ocean and Monterey Bay here in Santa Cruz
can be ideal, with winds from 15-20 knots, sunshine, and moderate swell:
2-4 feet. However, we can also get 20-35 knot winds, thick radiation
fog, & high seas. For discounts on chartering boats with Pacificsail, please
click on our Membership
program.
| Santa Cruz Fleet | # of days >>> | 1* | 1* | 2** | 3 | 3 | 5 |
|---|---|---|---|---|---|---|---|
| Non-Member Rates | Boat Name | M_F | S/Su | S/Su | M-F | S/Su+ | M-F |
| 1978 Santa Cruz 27 | "La Paz"*** (Instruction only) | $260 | $295 | $495 | $325 | $395 | $480 |
| 1986 Olson 911s | "Avatar" *** (Instruction only) | $280 | $310 | $610 | $525 | $575 | $760 |
| 2000 Catalina 32 | "Pacific Spirit" | $290 | $320 | $630 | $670 | $750 | $985 |
| 1996 Beneteau 31s | "Coup de Vent" | $290 | $320 | $630 | $670 | $750 | $985 |
| 2005 Hunter 33 | "Sea Breeze" | $305 | $330 | $650 | $680 | $770 | $1,125 |
| 2005 Beneteau 32 | "Evasion" | $305 | $330 | $650 | $680 | $770 | $1,125 |
| 2000 Catalina 32 | "Avalon" | $290 | $320 | $630 | $670 | $750 | $985 |
| 2001 Catalina 36 | "Perspective" | $310 | $350 | $680 | $710 | $800 | $1,150 |
| 2008 Beneteau 34 | "Nessie" | $310 | $340 | $665 | $700 | $790 | $1,150 |
| 2017 Beneteau 38 | "El Capitan" *** (see below) | $470 | $540 | $1,010. | $1,375 | $1,525 | $2,800 |
| 2005 Hunter 41 | "Twin Vikings" | $380 | $420 | $810 | $910 | $1,195 | $1,410 |
| 2000 Beneteau 46 | "Zazen" *** (see below) | $410 | $470 | $850 | $975 | $1,280 | $1,500 |
*** Note: The Beneteau 38, "El Capitan" is only discounted 30% on weekdays for members.
*** Note: The Beneteau 46, "Zazen" is only discounted 30% on weekdays for members.
If members charter multiple weekdays consecutively, the discount after the first day is 20% per day.
If you do book a boat, please have a crew member that has
Intermediate
sailing experience as your first mate. Our crew list works great if you
need experienced crew. Please click here for information on our Crew
List.
If you have just been Bareboat Certified we prefer that you have first
mate has Bareboat Chartering Level
for your first few charters.
Although many sailors have sailed their own boat or a chartered a yacht
in similiar conditions (racing & cruising), many have not performed the man over board procedure, docking in tight quarters, sailing in 25-30
knots of wind and large swell, navigating in thick fog, etc. If you
haven't been formally trained in the above topics, we recommend a group
or private class before challenging the practical bareboat check-out or
asking to Bareboat Charter our boats. Thank-you. Please review our
check-out requirements.
Bedding is not included onboard our yachts.
Dishes, pots, and pans are not included onboard but are available at an
extra cost.
Please - NO HARD COOLERS OR ICE CHESTS - they scratch our beautiful
soles (floors).
CANCELLATION POLICY - RAIN OR ADVERSE WEATHER - 100% Refund •
7 day Cancellation - No charge • 3 DAY Cancellation - 50% charge • 24
HR. Cancellation 100% charge - unless serious medical excuse. If the boat
you have reserved hasn't been requested for the same date by a boat
owner or previous charterer, there is no charge.
 USCG Captain's are available at $35.00 per hr.
Where's there to go sailing on the Monterey Bay?
Click here
For discounts from 15% to 50% off of the Bareboat Rates, please
visit our
Membership page.
* 1-day charters are from 9am to 1 hr before sunset
*** Not available for bareboat charter- classes only
Pacific Yachting & Sailing Members get 15% to 50% off of all Bareboat Charters. 1/2 Day rates are for members only /week-days only.
The deductable deposit ranges from $2,800.-$5,600. depending on the value of the boat you are chartering. We just require a credit card # on file.
Sorry, no night sailing and no singlehanded sailing.
Office Hours Weekday 9:30 am - 5:00 pm Mornings are the best time to meet someone in our office or to check out our fleet. Weekend 9:00 am - 1:00 pm (we're open all week-end until sunset with classes, Skippered Charters, etc. Only our office closes at 1:00p.m.)
Sign Up Now!
Course Calendar
Recommendations & Testimonials
Want more info? Try our
FAQ.
Feel free to contact us to find out more about our sailing courses or to
sign up directly.
(831) 423-SAIL
(800) 374-2626
info@PacificSail.com
Practical Checkout Evaluation Form
| Candidate's Name: | Date |
|---|---|
| Evaluator's Name: | |
| Sailing Skill Tested | Score |
| Maneuvers | |
| Departing and returning to slip (docking) | (15) |
| Upwind Sailing (points of sail, tacking) | (15) |
| Downwind Sailing (points of sail, controlled jibe) | (15) |
| Heaving To | (10) |
| Reefing | (10) |
| Crew Overboard Recovery | (20) |
| Properly securing boat at end of sail | (10) |
| Basic Nav- STD & plot course to Monterey | (5) |
| Total Score (90% passing) | |
| Comments: | |
| Control/Command | |
| Proper Preparatory and Execution Commands | (10) |
| Proper and steady course "as called" | (20) |
| Proper sail trim | (15) |
| Smoothness of maneuvers (e.g., overshoot, boom control) | (20) |
| Always moving helm in the proper direction (Y/N) | (5) |
| Smooth and proper jib sheet control | (10) |
| Overall safety and control | (20) |
| Total Score (90% passing) | |
| Comments: | |
| Evaluator's Recommendations: |
The purpose of the Practical Checkout is to assess the candidate's sailing knowledge and ability to competently and safely handle a sailboat, under both sail and power, in all wind and sea conditions with confidence, precision and ease. Skills covered in the checkout include docking and maneuvering under power in tight quarters, reefing, coastal navigation, all points of sail with appropriate sail trim and steerage, controlled jibes, tacking, anchoring, crew overboard recovery, proper boat set-up and securing, and more.
Use the Evaluation Form to score the candidate's level of expertise in each skill area. The numbers in parentheses in the "Score" column are the maximum number of points allotted to each skill. There are 100 points possible for each section, "Maneuvers" and "Control/Command". A score of 90% in each section is required to pass the Practical Checkout.
At the end of the checkout, please sign and deposit the Evaluation Form in the staff mailbox in the office, or in the mailbox outside the office door.
Crew Overboard Recovery: At PY&S we teach both the "Figure 8" and "Quick Stop" methods of COR. The candidate is not required to use either of these methods. He/she is allowed to use any method to recover the victim. The only prerequisites are:
- Recovery must be done under sail.
- Vessel and crew must be under control at all times.
- Vessel must be dead (or nearly so) in the water when alongside the victim.
- Victim must be recovered on leeward side of the vessel.
Please read below for free useful information
Rules, Rules, Rules... New Contract Addendum
In addition to our main Bareboat Contract that not all of our charterers read as thoroughly as we'd like them to, we created another page to sign when you arrive to charter a boat. We simply want to reiterate most of the things you were taught and are more than likely practicing. Here's what we put in the additional contract addendum.
- As the Bareboat Certified Skipper, I agree to exercise prudent seamanship and to use good judgment at all times.
- In addition to completing the pre-cruise check-out, I agree:
- To perform all of the following tasks with the crewmembers before
departing the slip:
- Teach at least one crewmember how to use the radio, which channels to use, and who to call in case a problem arises.
- Show the crewmembers the pre and post cruise checkout form and explain how all of the onboard safety gear works.
- Demonstrate and practice reefing with a designated crewmember.
- Show at least one crewmember:
- The proper technique for handling the dock lines and walking the boat out before departing and returning to the slip.
- How to coil and stow dock lines and fenders on board the boat. (Have them do this while motoring out of the channel.)
- How to deploy the anchor in a short period of time if needed, even in the harbor entrance.
- To stay at least a quarter mile away from any shore with the exception of heading into or out of the Santa Cruz, Monterey or Moss Landing Harbors, or when entering or leaving the anchorages at Stillwater Cove, Capitola Moorings or either side of the Santa Cruz Wharf.
- To stay at least a half mile off of Soquel Point, Santa Cruz Point, and Point Pinos.
- To immediately turn away from any kelp bed and head for deeper water.
- To personally verify the conditions at the Santa Cruz Harbor entrance (both depth and swell) before departing and returning to the harbor. If any substantial swell, what so ever, is present, I will turn the boat around and return to the slip if still in the harbor, or proceed to the Santa Cruz anchorage if I am caught outside.
- To personally verify the conditions on the Bay and not depart from my slip or anchorage if the winds, swell, or fog is dangerous.
- To navigate at all times and if a severe fog develops, and I'm uncomfortable with my exact position I agree to anchor if close to shore, or call vessel assist for assistance. (Phone # is on the post-cruise check-out)
- To have everyone onboard wear a Personal Flotation Device.
- To perform all of the following tasks with the crewmembers before
departing the slip:
For whatever we lose it's always ourselves we find in the sea E. E. Cummings (1894–1962), U.S. poet. Maggie and Millie and Molly and May
Cell Phones vs. VHF radios
Every Pacific Yachting boat is equipped with a VHF radio. In the best of conditions, your VHF may be heard up to 20 miles. Realistically, however, the range is only about 7-10 miles. A cellular phone works great on a boat. If you have one, we highly recommend that you bring it with you. A cell phone has much greater range you can speak as you would in a normal telephone conversation.
When using the VHF radio, please use proper radio etiquette.
Turn It On and Leave It On
Technically, you're supposed to monitor channel 16 at all times, not just for your safety but to be able to provide aid to other boaters. This is also a good way to keep informed of weather and sea conditions. Learn to use the "squelch" function to keep the static to a minimum. If you hear a Coast Guard announcement that there is important information being broadcast on channel 22A, tune it in
Use The Right Channel
Channel 16 is the emergency and hailing channel. Channel 16 is for hailing or emergency use ONLY. DO NOT USE CHANNEL 16 FOR A RADIO CHECK-USE CHANNEL 9 OR 68. This isn't CB radio where you chat on whatever channel you want. Use 16 to contact a vessel or shore station and then move your conversation to a non-commercial "working" channel. Working channels are 68, 69, 71, 72, and 78 (72 is for ship-to-ship traffic only).
Talk The Talk
On channel 16, say the name of the station (boat, marina, etc.) you're calling to three times, then say "this is" followed by your station name (your call sign or your boat's name) once followed by "over". Calls are answered the same way. Once you've been answered, ask the station to switch to a working channel (one you've monitored to make sure you won't interrupt a conversation), followed by "over".
Keep It Short
When you receive confirmation, switch to the new channel, repeat the call and continue the conversation. A VHF isn't a cell phone, so don't yammer away about what you had for dinner last night. Keep your conversation brief and to the point, even on working channels.
Keep It Clean
Once you have moved your conversation to a working channel, it does NOT mean it's now a private conversation. Anyone and everyone within range can listen in, so think twice and speak once. And the radio is NOT a toy, so don't let anybody play with it. It's actually a felony to interfere with emergency broadcasts, not to mention potentially life-threatening ones.
As an example, let's say you want to contact Vessel Assist. Here's how to do it:
- Adjust the squelch and set the volume at about half way.
- On Channel 16, LISTEN before calling to be sure there is no one else using the channel.
- Speak clearly, and repeat three times, " Vessel Assist, Vessel Assist, Vessel Assist, this is vessel "Summer" on channel 16, do you copy?"
- Wait for a reply. If no response, wait 1 minute and try again. If still no response, wait one minute before retrying. This allows other traffic on the channel to proceed.
- When Vessel Assist answers, they will ask you to switch to a working channel, probably Channel 68.
- Switch to the requested channel and hail as you did originally. When Vessel Assist answers, explain your situation. Hopefully you have been a prudent navigator and can relay your latitude and longitude coordinates. Failing that, describe your position relative to known landmarks, for example, 1 mile south of Soquel point, etc. etc This will be helpful. Almost all of the Pacific Yachting boats have a GPS. Giving them the exact lat/lon is ideal.
- Every time you've finished a communication, you need to say "over". When you're completely finished with your conversation, you need to say, "This is Summer clear on Channel 68, switching to Channel 16."
Every Pacific Yachting boat will have a large plastic box onboard in which will be stowed flares, horn, first aid kit, winch handles, manual bilge pump handle, a flashlight and small tool kit. Please return all items to these plastic boxes after every sail.
Also, on the top every chart table there will be a laminated sheet that will give you directions about the vessel you are on. It will have the location of the thru-hulls and engine oil dipstick, where the transmission shifter cable attaches to the transmission, as well as other instructions on how to operate the vessel. Please return this laminated sheet to the top of the chart table before you depart the boat after your sail.
Pre & Post Cruise Check-out forms
Please use the pre- & post-cruise checkout forms and be 100% honest about checking everything off after you've found it or tried it. You'll find it's much easier to do all of these things before departure rather than calling the office from the boat asking where things are, how to do something, etc. You'd be surprised how often this happens.
A common thing sailor's check off on the sheet without really checking thoroughly is the anchor; where it is, how to deploy it in a hurry, etc. It's always amusing getting that radio call from a charterer that has checked off winch handles on the pre-cruise sitting on my desk and they ask desperately where they are.
Fuel Money (Bareboat Charterers) and & Parking Permits
If you Bareboat charter, we give you one master parking permit, which you are required to return to our mailbox, placing it in the plastic pouch. Please remember to return it. If you have additional cars in your party, they can purchase the $5.00 all-day meter permits we pre-purchase from the Santa Cruz Port.
At the end of the day, Bareboat charterers are required to put the permit, fuel reimbursement money, and your honestly filled out post-cruise sheet back in the pouch in the mailbox on the side of the Pacific Yachting Office. Often, I get the pouch with the permit and post-cruise but no fuel reimbursement money. This is on an honesty basis. Even if you've used the engine just to leave the slip & return, you are using fuel. The only way we can avoid placing a flat fee charge for fuel on every charter is if each charterer is conscientious about reimbursing us for fuel they've used.
Emptying the Holding Tank
If you're out 3 miles and anyone has used the head, please go below, open the holding tank thru-hull and hit the macerator switch for about 5 minutes. It's a good idea to pump the head while the macerator is running (until the last couple of minutes) because the infusion of water helps clean it out. (Even if no one in your party has used the head, we'd appreciate it if you'd empty the holding tank as a courtesy to the next charterer-Thanks!).
If you don't know how to work the macerator or where the thru-hull is, please ask the Pacific Yachting staff. You'll also find directions on the laminated direction sheet on top of the chart table.
Reefing is not a city in China
Yep, here's my annual lecture on Reefing. Spring can bring with it some howling, great winds. All of the Pacific Yachting boats have the ability to sail in winds up to 30 knots. Above 30 knots, please take all sails down and come in. You'll get a refund.
Why so many sailors push a boat to heel excessively is beyond me. The increased drag causes the boat to slow down and creates excessive weather helm. You may have one macho friend that enjoys it but everyone else onboard is trying to defy gravity as the people on the
windward side get further away from the water and the people on the leeward side start to get inches from the water; your spouse is yelling, "I'm never sailing again", every one's wet, etc. The prudent sailor (i.e., one who wants company the next time he/she goes sailing) reefs early and deep-"The time to reef is when you first think about it".
Here's my moderately conservative reefing guidelines (modify for the sailing characteristics of the individual boat. The goal is to BALANCE the sail plan so the boat sail efficiently without excessive weather helm):
Under 15 knots-full main and full jib or 2/3rds jib
15-19 knots- 1st reef in the main/ 50% to 2/3rds
20-24 knots- 2nd reef in main/ 30% to 50% jib
25-29 knots - 2nd reef in main or no main/50% or no jib
30 + knots- TIME TO DOUSE ALL SAIL AND HEAD FOR THE DOCKS!
You need Competent Crew
Ok, many of you need to send your family members or friends through the Pacific Yachting
We don't and won't allow machismo sailors to take out grandma, the kids, and wife Betty without a competent crew. You may think you'll do OK politely asking them from the wheel, "please pull the port jib sheet in." But, after they look at you in bewilderment, the jib is luffing profusely and you yell, "Pull that f. g white rope over there, now", you realize you were a jerk and they have seen a side of you that they never knew existed. So please abide by the Pacific
Anchoring
This may be a good opportunity to actually practice anchoring. Please don't anchor where the moorings are in Capitola. There's a possibility your anchor could getcaught up on the mooring at the bottom. You can anchor on the other side of the Capitola wharf or further down a bit towards the cement ship for a short period only.
Please Note Regarding Holding Ground
Most places along our stretch of the coast, from Santa Cruz Point to Monterey, do not have very good holding ground for anchoring. A couple of exceptions are either side of the Santa Cruz Wharf or the Capitola Wharf. The waves pound the sand continually, compacting it and making it difficult for the anchor's flukes to dig in properly. Please make sure never to anchor too close to a lee shore or too close to any shore for that matter.
Here's a refresher on setting up, deploying and retrieving the anchor
Setting Up
- On boats without an anchor windless (like most of the boats in our fleet), pull the anchor and rode completely out of the anchor locker before deploying (if fitted with an electric windlass you don't need to do this). Make sure all the kinks are out of the rope rode so that it will pay out freely without jamming on anything. The easiest time to do this is prior to leaving the dock, as part of your pre-cruise preparations.
- Make sure the bitter end is tied to the boat. The best place for this is to a padeye inside the anchor locker. If not, secure it to one of the bow cleats with a bowline knot.
- Return the rode to the anchor locker. Remember to put the rope rode in first, then the chain rode and lastly the anchor on top of the pile of rode. To make sure the rode remains free of kinks when its deployed, lay it in the bottom of the anchor locker in large, lazy figure eights.
- Check the nautical chart for the depth of water where you'll be
anchoring. Set up the anchor rode so that you are ready to let out 7 to
10 times the depth. If the rode is not marked (many of our boats are not
so marked) an easy way to determine how much rode to deploy is as
follows:
* Convert the length you'll need from feet into fathoms (1 fathom = 6 feet). On the side deck, lay out approximately six-foot lengths of rode in the number you'll need to deploy. For example, the depth of water is 20 feet; the distance from the boat's bow to the water line is 4 feet, a total of 24 feet of depth (always include the height of the bow off the waterline in your depth calculations). Seven times 24 (7 to 1 scope) = 168 feet. Divide 168 by 6 and you'll need 28 fathoms of rode to achieve a 7 to 1 scope. Lay out 28, six-foot lengths on the side deck. Cleat off the rode at this point to the bow cleat. Put the rode back in the anchor locker (make sure the bitter end runs fair under the anchor locker lid). Now you know exactly how much rode to pay out. REMEMBER, if you're unsure of how much rope to deploy, more rode is better than less! - Before reaching the anchorage, the bow person and helmsperson should agree on hand signals to communicate. This will make the anchoring drill go much more smoothly and is much more efficient than hollering back and forth from the bow to the cockpit (plus, you'll impress others in the anchorage with your calm, organized approach to anchoring). The signals you'll want to determine are a) forward, b) reverse and, c) neutral.
- When handling the anchor, whether deploying or retrieving, remember to protect your lower back-bend at the knees, tighten your abdominal muscles and keep your lower back straight. Anchors are heavy and aukward to handle both factors which increase the risk of muscle strain. When you are ready to deploy the anchor, the boat should be head-to-wind, in neutral gear and virtually dead in the water.
- The bow person slowly, hand-over-hand, lowers the anchor off of the bow roller or through the forward chock (REMEMBER, never throw the anchor over. This is dangerous and when the anchor hits the water it can tumble and catch the chain rode in the flukes, preventing the anchor from setting). Signal the helmsperson to go in reverse for 10 seconds and then back to neutral. Continue to pay out rode until approximately 2/3rd of the rode has been deployed. If the bow of the boat blows off the wind, as sometimes happens in stronger winds, simply snub the rode on the bow cleat. This will pull the bow back into the wind and you can then continue paying out rode.
- Once you've paid out 2/3rd of the rode, snub the rode on the bow cleat and signal the helmsperson to go into reverse and increase the throttle just a bit. The slack will go out of the rode and the anchor will begin to set. Watch the rode. If the rode is bouncing up and down (called "chatter") the anchor is not set. When the anchor is set, you'll see and can feel a steady pull without any chatter in the rode.
- Once the anchor is set, signal the helmsperson to go into neutral and pay out the remainder of the pre-determined length of rode. You may need to signal the helmsperson to go into reverse from time to time. Once all the rode is out, have the helmsperson go into reverse and increase the throttle. If the anchor is set, once the slack is out of the rode the boat should not back up any more. As a matter of a fact, when the engine is put in neutral the boat will actually bounce forward a bit due to the flexibility of the rope rode.
- Before you jump off the boat and go ashore for that refreshing beverage or lunch, watch the boat for a while. Let the boat settle down. Take visual bearings on buildings or other landmarks. Ensure that the boat is staying in relatively the same place. If the bearings change,you're dragging anchor!
- Most of the time, you'll be successful the first time. Sometimes, however, the anchor will drag. If this happens, first try letting out more scope; maybe 10 to 1. If this doesn't work, you'll need to raise the anchor and try again in a different location within the anchorage. Don't fret. It happens to everyone and, it's good practice!
- Just as in deploying, pulling up the anchor should be a slow and deliberate operation. When the bow person is ready to retrieve the anchor, signal the helmsperson to put the vessel in forward for 10-second increments. As the vessel moves forward, the bow person pulls in the slack in the anchor rode and stows it on deck. REMEMBER, you are using the momentum of boat to approach the anchor, NOT pulling the boat up to the anchor (very bad on the back)! The safest way to retreive and stow the anchor rode is with the anchor locker lid CLOSED. Once the rode and anchor are aboard, open the locker and stow the ground tackle.
- The helmsperson cannot see the anchor rode from the wheel. So, again, the use of hand signals is important. Ideally, a third crew will be giving hand signals from the foredeck while the bow person is hauling in the rode. If there are just two of you, the bow person has to do double duty. Whoever is giving the signals needs to let the helmsperson know when to slow down (if the boat goes too fast in forward it can run over the rode and get it caught around the keel or,worse yet, around the prop), and which direction to head for the anchor.
- Once the bow is directly over the anchor and all the slack is out of the rode, wrap the chain or rope rode around the bow cleat. If the anchor does not readily break free, don't try to "muscle" it up-you can hurt yourself. Signal the helmsperson to go into forward and slowly increase the throttle. This should break the anchor out of the bottom. When you feel slack come into the rode, continue pulling the anchor up until you can grap it and pull it on deck (remember to protect that lower back). Please be careful not to knock the bow gel coat with the sharp fluke of the anchor. That's it. Oh, also it's good karma to neatly coil the anchor rode back in the anchor locker as well.
This time of year we can get days so clear it seems like you could throw a rock over to Monterey. The seas are calm and the winds range from 10-20 knots. However, there are also times when the harbor entrance shoals and fairly large swells can be breaking across it. It is prudent to check on the condition of the harbor entrance before departing on your sail. Check with the office staff or the Harbor Master's Office for an update or, take a nice walk out to the end of the West jetty and see for yourself (while you're there, check out the progress on the new lighthouse). We wouldn't allow you to go sailing if it looks dangerous.
While making your way out of the harbor, raise the mainsail (we always recommend having your main up exiting and returning to the harbor to increase boat speed and control and as a precaution should your engine ever fail), stay as far to the right as possible, observe the entrance and, if a swell is running, try to time your exit between sets of waves (waves come in sets, usually 5-8 at a time, with periods between sets). Should you arrive at the entrance during a set, slowly motor in circles within the channel until there is a lull between sets, then exit (be sure to sheet your main in to prevent an accidental jibe as you're circling).
When you've decided the time is right, throttle up, trim the mainsail, and set a course for 30 to 40 degrees to the face of the swells. "Quartering" the swells will prevent the boat from pitching up and down off the back of the wave ("hobby horsing"), reducing the possibility of lifting the propellor out of the water, and will keep the boat speed up-all important when making your way over swells. Remember to have all crew SIT DOWN and HOLD ON! Once you're well clear of the swell line (sometimes 100 to 200 yards off the entrance), throttle back, raise or unfurl the jib, shut down the "iron genny" and GO SAILING!
When returning to the harbor, start the engine at least 1/2 mile out. If the engine won't start, now's the time to find out, not when you're in the middle of the entrance with breaking waves on your stern. You'll have the opportunity to tack or jibe around, away from the harbor entrance and stand off until Vessel Assist or the Harbor Patrol can give you a tow in.
When beginning your approach, assign one crew the responsibility of looking astern for swells. The crew and helmsperson should be in virtually constant communication regarding the height and frequency of the swells not only astern but at the harbor entrance as well. As in your departure from the harbor, you're goal here is to enter the harbor BETWEEN sets of swells or, at the least on the back of one of the smaller swells of the set. Timing is fairly critical here. Displacement sailboats DO NOT like to surf down the face of a breaking wave. The rudder loses its "grip" on the water and the boat broaches (turns beam to the waves) and everybody gets wet-Not a fun way to end your pleasant day sailing. Just as in exiting, you can circle 100 yards or so outside the harbor entrance, timing the swells and wait for a break before beginning your entrance. Remember, don't be in a hurry to get back into the harbor. Patience is a verture in this situation. You'll be safe standing off. Once you've decided to go for it, try to match your boat speed to that of the swells and enter behind the breaking wave.
Please stay away from the coast while sailing. Although, the swell may seem small out on the Monterey Bay, close to shore they can build up and break out in locations that they didn't during the summer.
If you want to reserve a boat, please check the swell, waves, and tides. Below are a couple of good links we often use. It can still be dangerous near the shoreline and close to the harbor entrance at times, especially at low tide. Please have the utmost respect for waves and swell. Their power is insurmountable and may not have the same agenda that you plan to have. Use proper judgment at all times.
Ironically, the last month has been unbelievably beautiful. The air temps have been in the mid sixties to mid seventies. Winds have been 10-15 kts. Visibility has been so clear; Monterey looks like it's a stone's throw away...
Visit our resources page for information on our tides, swell, weather, and a live web cam of the Harbor Entrance.
Securing Boats
Most of our charterers are doing a great job of properly securing the boats at the end of the sail. This becomes even more important during the fall and winter months when the harbor can experience strong surge due to storms offshore. The surge really moves the boats around in their slips and puts added loads on dock lines and increases chafe on both lines and boat cleats. So, here's a refresher on how to properly secure the vessel after your sail.
There are two sets of lines used to secure the boat to the dock-"bow" and "stern" lines, which secure the bow and stern, respectively, keeping the boat parallel to the dock; and, "spring" lines which keep the boat from moving forward and aft in the slip. Both sets of lines need to be properly rigged to secure the boat.
1. Once in the slip, or at the end tie, adjust the bow and stern lines so that the boat is lying parallel to the side of the dock. It's common to find a boat with the bow pulled in much too close to the dock and the stern too far away. To help get the boat lying parallel, visualize a line cutting through the boat at the beam from port to starboard. This line should form a 90* angle with the dock. Stand well in front of the boat where you can better see the alignment and direct your crew to adjust the bow and stern lines until you've achieved this 90* angle. Secure the bow and stern lines to the dock cleats with a cleat hitch (refer to Sailing Fundamentals or Cruising Fundamentals to review the proper way to tie a cleat hitch).
2. Now, for the spring lines. These are the most critical lines for combating the "dark side" of the surge force. Most of the boats in the PY&S fleet have continuous dock lines which serve as both bow/stern lines and spring lines. Once the bow and stern lines are cleated, run a turn under the dock cleat before leading it forward or aft to secure to the boat as the spring lines (this turn under the cleat will prevent your nice neat cleat hitch from pulling off the cleat). Now, where do we attach the spring lines to the boat? Ideally, we'd lead the line to a mid-ship cleat on the boat's sidedeck and secure it with a cleat hitch. Unfortunately, most of our boats don't have mid-ship cleats. So, the next best place is to the chainplates (those big hunks of stainless steel sticking up out of the sidedeck to which the shrouds are attached). Use a round turn and two half hitches (again, check Sailing or Cruising Fundamentals for the proper way to tie this knot) to secure both the forward and aft spring lines. And, what's the part of the boat we NEVER tie the spring lines to? Right, the stanchions! Stanchions are not made to withstand the loads produced by the boat moving forward and aft. The bases will loosen allowing water to find its way into the deck's core, or the stanchion will bend or pull out of the deck-all very bad things!
3. Lastly, let's make sure the fenders are in the right place and are secured properly. Fenders should be placed at or near the beam of the boat. If the boat is tied up parallel to the dock (remember how we were very careful to adjust the boat's orientation to the dock a couple of paragraphs ago?) the beam of the boat is where it will make contact. Typically, two or three fenders are attached to the boat, two-to-three feet apart along the beam. The fenders should be adjusted so that the top of the fender is about three-to-four inches above the edge of the dock. Now, where to tie these guys? Rather than tying the fender line to the bear lifeline, try to find a stanchion close to where you want to position the fenders. Lead the fender line around the top of the stanchion and tie a clove hitch around the lifeline on one side of the stanchion. This way the stanchion is taking most of the load rather than the lifeline itself. Your knot will stay tight and the fender will stay at the proper height.
4. By following these simple guidelines you'll help reduce the wear and tear on boats and docklines and, you'll be the envy of other charterers by exhibiting good seamanship.
 Like us on Facebook
 Review us on Yelp
 Find us on Google